Interior design styling transforms empty square footage into rooms people actually want to live in. It’s not about chasing trends or filling every corner with tchotchkes, it’s the practical skill of arranging furniture, balancing color, layering texture, and making deliberate choices that turn a house into a home. Whether someone’s moving into their first place or freshening up a room that’s felt stale for years, understanding the fundamentals of styling helps homeowners get professional-looking results without hiring a decorator. This guide walks through what styling actually means, the core elements that make it work, and the step-by-step process anyone can follow to style any room in their home.
Table of Contents
ToggleKey Takeaways
- Interior design styling transforms rooms through intentional furniture arrangement, color balance, and texture layering—accessible to DIYers without hiring a professional decorator.
- A balanced color palette uses 60% dominant neutral, 30% secondary color, and 10% accent color, while mixing textures like linen, velvet, and jute prevents flat, unfinished spaces.
- Proper furniture arrangement requires identifying a focal point, maintaining 36 inches of clearance for walkways, and using an appropriately sized rug to anchor seating areas.
- An 8-step process—assessing function, measuring, choosing colors, arranging anchor pieces, layering lighting, adding textiles, styling surfaces, and editing ruthlessly—guides effective room styling.
- Budget-friendly styling options include shopping secondhand, strategic paint projects, DIY artwork, and investing in a few high-impact pieces while using existing items creatively.
- Common styling mistakes to avoid include pushing all furniture against walls, relying on overhead lighting only, choosing rugs that are too small, and chasing trends that quickly become dated.
What Is Interior Design Styling and Why Does It Matter?
Interior design styling is the finishing layer that comes after the bones of a room are in place. It’s what happens after walls are painted, flooring is installed, and built-ins are done. Styling involves selecting and arranging furniture, textiles, lighting, artwork, and decorative objects to create a cohesive look that reflects how the space will be used.
It matters because a well-styled room functions better. A thoughtfully arranged living room encourages conversation. A bedroom styled with blackout curtains and layered bedding promotes better sleep. A kitchen with open shelving styled for both access and aesthetics makes cooking less frustrating. Styling bridges the gap between construction and comfort.
Unlike full-scale interior design, which often involves structural changes, custom millwork, and professional trades, styling is accessible to DIYers. It doesn’t require permits, demolition, or a contractor. It does require intention, a measuring tape, and willingness to rearrange furniture until it works. Many homeowners who explore design fundamentals find that styling is where their personal taste really takes shape.
Essential Elements of Interior Design Styling
Color Palette and Texture Selection
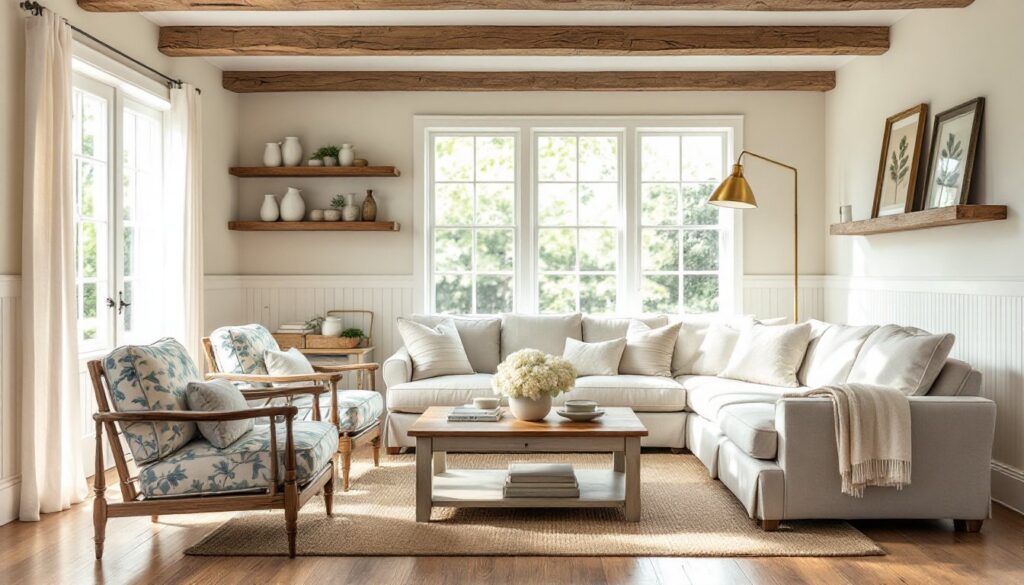
Color sets the mood, but texture keeps it from feeling flat. A successful color palette usually includes a dominant neutral (60% of the room), a secondary color (30%), and an accent color (10%). This ratio isn’t law, but it prevents rooms from feeling chaotic or washed out.
Neutrals don’t have to mean beige. Greige, warm whites, charcoal, and soft sage all work as foundation colors. The secondary color might show up in upholstery, curtains, or a large rug. Accent colors pop in through pillows, artwork, or a single painted furniture piece.
Texture adds depth without adding clutter. Pairing a linen sofa with a jute rug, velvet pillows, and a chunky knit throw creates visual interest even if everything shares the same color family. Mix smooth and rough, matte and gloss, soft and hard. A room styled entirely in one finish, say, all glossy or all matte, feels unfinished. Designers at Elle Decor frequently highlight how layering textures elevates even minimal spaces.
Furniture Arrangement and Space Planning
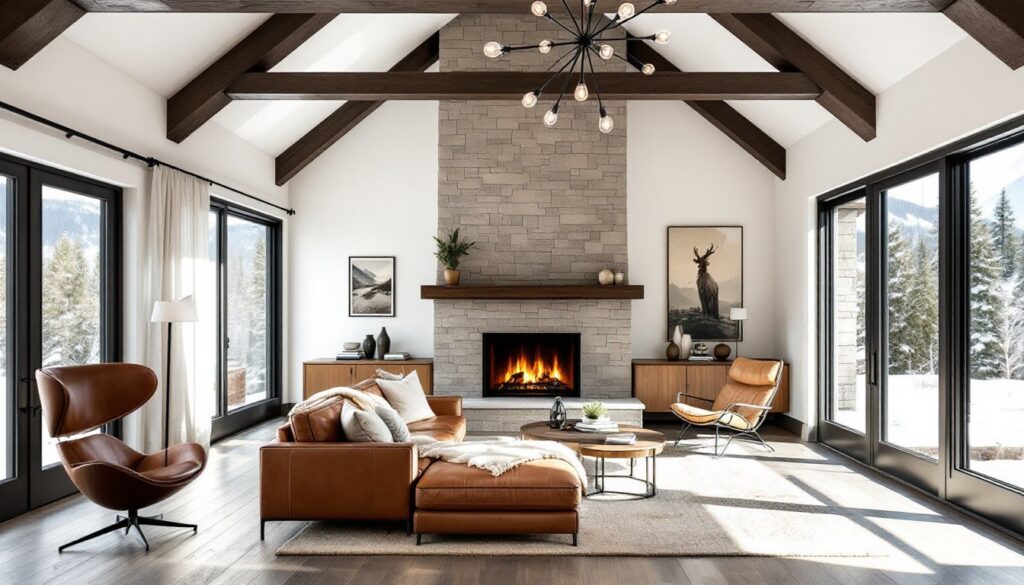
Furniture placement makes or breaks a room’s usability. Start by identifying the room’s focal point: a fireplace, a large window, a media console, or an architectural feature. Arrange seating to face or complement that focal point, not fight it.
Traffic flow comes next. Leave at least 36 inches of clearance for main walkways and 18-24 inches between a coffee table and seating. If people have to sidestep furniture to cross a room, the layout isn’t working.
Scale matters. A sectional that fits in a showroom can overwhelm a 12×14 living room. Measure the room and the furniture before buying. Painter’s tape on the floor works great for visualizing footprints. Floating furniture away from walls often makes a room feel larger, not smaller, because it defines zones and improves flow.
Anchoring furniture groups with an area rug ties the arrangement together. The rug should be large enough that at least the front legs of seating pieces rest on it. A too-small rug makes everything look disconnected.
Step-by-Step Process for Styling Any Room
1. Assess the room’s function. Write down how the space will actually be used. A living room might need to handle movie nights, kids’ assignments, and hosting guests. A bedroom might need a reading nook and better closet access. Function dictates furniture selection and placement.
2. Measure everything. Record room dimensions, ceiling height, window and door locations, and any fixed features like radiators or built-ins. Measure furniture, too, both what’s staying and what’s being considered.
3. Choose a color palette. Pick the dominant neutral first, then build from there. Pull colors from a favorite piece of art, a rug, or even a paint chip. Homes with Scandinavian-inspired styling often lean on soft whites and natural wood tones for a clean, cohesive look.
4. Select and arrange anchor pieces. Start with the largest items: sofa, bed, dining table. Position these first, keeping traffic flow and focal points in mind. Don’t push everything against the walls unless the room is very small.
5. Layer in lighting. Every room needs three types: ambient (overhead or general), task (reading lamps, under-cabinet lights), and accent (picture lights, sconces). Styling relies on lighting as much as furniture. Swap builder-grade fixtures for something with character if budget allows.
6. Add textiles and softness. Curtains, rugs, pillows, throws, these make a room feel finished and livable. Curtains should skim the floor or puddle slightly: hanging them just above the window frame makes ceilings look low. Whether working on a rental property or a personal space, textiles are the fastest way to add warmth.
7. Style surfaces and walls. Group decorative objects in odd numbers (3 or 5). Vary height and shape. Leave some surfaces empty, negative space prevents clutter. Hang artwork at eye level (typically 57-60 inches to the center of the piece). Use a level and painter’s tape to preview before hammering nails.
8. Edit ruthlessly. Remove anything that doesn’t serve the room’s function or aesthetic. Overaccessorizing is one of the fastest ways to undo good styling work.
Common Interior Design Styling Mistakes to Avoid
Ignoring scale and proportion. A massive sectional in a small room or tiny accent chairs in a large space throws off balance. Furniture should fit the room, not dominate or disappear in it.
Pushing all furniture against walls. This works in very small rooms, but in most cases it makes spaces feel awkward and conversation circles too spread out. Floating furniture creates intimacy and flow.
Overhead lighting only. A single ceiling fixture flattens a room. Layering in table lamps, floor lamps, and sconces adds warmth and dimension. Dimmers help, too.
Matching everything. Furniture sets sold as a package often look staged, not styled. Mix finishes, eras, and materials for a collected-over-time feel. Guides on modern classic interiors show how to blend traditional and contemporary pieces effectively.
Skipping the rug or choosing one that’s too small. A rug defines a seating area and anchors furniture. In a living room, aim for at least an 8×10 if the space allows. In a dining room, the rug should extend 24 inches beyond the table on all sides so chairs don’t fall off when pulled out.
Hanging curtains too low or too short. Mount curtain rods close to the ceiling, not just above the window trim. This draws the eye up and makes ceilings feel higher. Curtains should just touch the floor or have a slight break.
Overloading with trends. Trends cycle fast. Rooms that chase every look featured on design platforms end up feeling dated quickly. Anchor a room with timeless pieces and add trends in small, swappable doses, pillows, throws, artwork.
Forgetting about negative space. Empty space is not wasted space. Rooms need breathing room. Not every shelf needs to be full, not every wall needs art.
Budget-Friendly Styling Tips for DIY Homeowners
Shop secondhand first. Thrift stores, estate sales, Facebook Marketplace, and Craigslist are goldmines for solid wood furniture, vintage rugs, and unique decor. A $40 dresser and $20 in paint can outperform flat-pack furniture that costs three times as much.
Paint is the highest-return styling tool. A gallon of quality interior paint covers roughly 350-400 square feet and costs $30-60. Painting an accent wall, a dated dresser, or builder-grade cabinets transforms a space for minimal cost. Designers at Homedit regularly showcase budget makeovers powered by strategic paint choices.
DIY artwork and decor. Large-scale art is expensive. Print high-resolution images or photography at a local print shop and frame them. Thrift store frames can be spray-painted to match. Even a gallery wall of inexpensive frames feels intentional if the spacing and alignment are consistent.
Rearrange before buying. Sometimes a room just needs furniture moved, not replaced. Experiment with different layouts. It’s free and often solves functional problems without spending a dime.
Invest in a few high-impact pieces. Not everything has to be high-end, but a quality sofa, a good mattress, or a solid wood dining table will outlast cheap alternatives. Pair investment pieces with budget finds.
Use what you have. Declutter, then shop the house. Items from one room often work better in another. A bedroom lamp might be perfect on a living room side table. A kitchen stool could serve as a plant stand.
Swap hardware and fixtures. Replacing cabinet pulls, drawer knobs, light switch plates, and faucet handles is inexpensive and makes a big visual difference. Most swaps require only a screwdriver.
Add plants. Live greenery softens hard edges and adds color without commitment. Pothos, snake plants, and ZZ plants tolerate low light and neglect, ideal for beginners. For those drawn to coastal aesthetics, greenery combined with natural textures creates that breezy, lived-in feel.
Focus on one room at a time. Spreading a budget too thin across the whole house results in half-finished spaces. Styling one room well feels more satisfying and livable than doing a mediocre job everywhere.
Styling a home is iterative. Rooms evolve as needs change, budgets allow, and tastes shift. The key is making deliberate choices, measuring twice, and remembering that a well-styled space serves the people living in it, not a magazine spread.